 how-to
How to Build a Structural Retaining Wall Step by Step
Quick Summary
A structural retaining wall is built by planning around wall height, surcharge, soil and drainage, then laying a compacted gravel base and stacking courses with offset joints and a level check at each step. Drainage behind the wall, using filter fabric, clean gravel and a sloped perforated pipe, prevents the water pressure that causes most failures.
- Call 811 before digging so buried utility lines are marked first.
- Ask the building department whether your wall height or surcharge requires a permit or stamped design.
- Build a compacted crushed stone base about 6 to 8 inches deep before laying the first course.
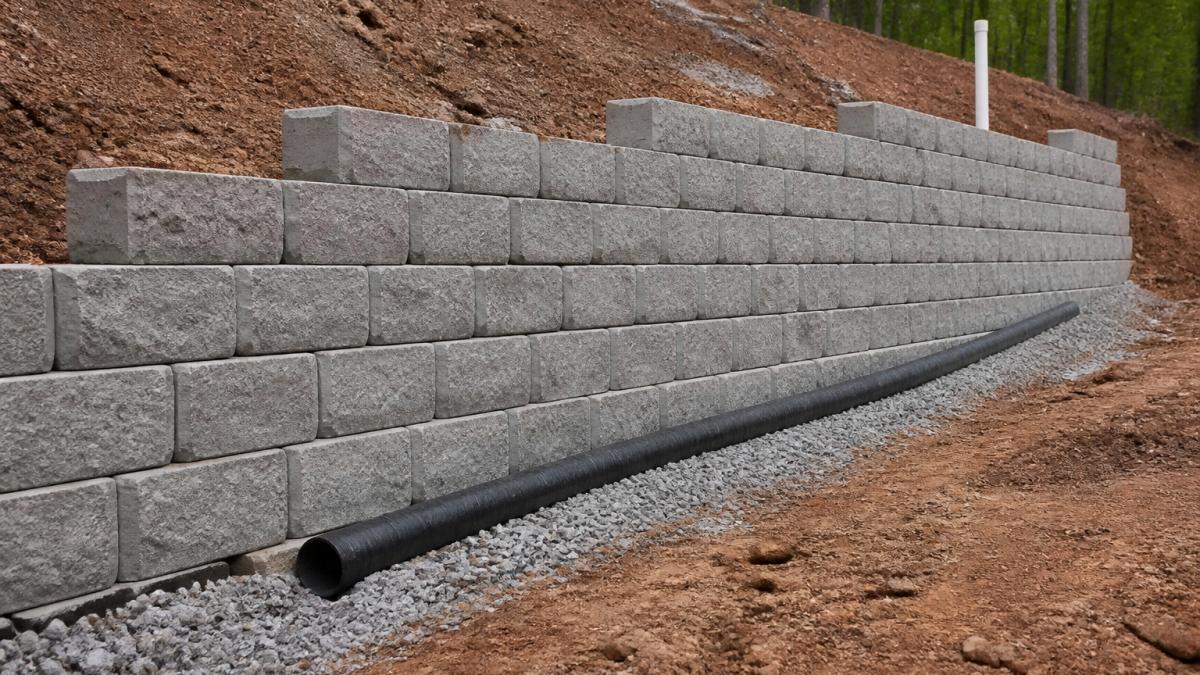
- Backfill with clean gravel behind the wall and install a perforated drain pipe sloping to an outlet.
- Backfill in compacted lifts of about 6 to 8 inches, keeping heavy compaction equipment a safe distance from the blocks.
Table of Contents
- How to Build a Structural Retaining Wall Step by Step
- Planning Your Retaining Wall: Site, Height, and Permits
- Choosing the Best Materials for Retaining Walls
- Tools and Materials Checklist
- Retaining Wall Foundation Depth and Excavation
- Retaining Wall Construction Steps: Laying Courses and Setting Alignment
- Retaining Wall Drainage and Backfill to Prevent Failure
- Book Your Retaining Wall Consultation with Solid Rock Brick
- Frequently Asked Questions
How to Build a Structural Retaining Wall Step by Step
Last Updated: November 1, 2026
Planning Your Retaining Wall: Site, Height, and Permits
Building a retaining wall is a serious structural job. Done right, it holds back soil for decades. Done wrong, it bulges, cracks, and can fail in a single rainy season.
Start by walking the site. Note where the slope is steepest, where water runs during heavy rain, and where buried utilities may sit. Mark the wall line with stakes and string, then measure the height at each end.
The pre-build checklist
Work through this list before you buy a single block:
- Call 811 before you dig (811 Before You Dig). The national Call Before You Dig service routes your request to the local utility operators, who mark buried electric, gas, water, sewer, and communications lines. Digging without marking risks injury, outages, and repair bills.
- Confirm property lines. Pull your survey or plat map and locate easements. A wall built across a property line or inside a utility easement may have to be removed at your expense, and many easements prohibit permanent structures.
- Check setbacks. Local zoning often requires a minimum distance from property lines, sidewalks, and storm drains. Setbacks vary by jurisdiction and by wall height.
- Ask the building department about permit thresholds. Many jurisdictions require a permit once a wall retains more than a set height, or when the wall supports a surcharge such as a driveway, patio, or building. Ask specifically whether your wall needs a permit, a plan review, or a stamped design.
- Identify the surcharge. Anything that adds load within a distance behind the wall roughly equal to the wall height, a driveway, a parked car, a shed, a pool, a slope above, increases the design load and often triggers engineering.
When a retaining wall needs an engineer
Most short landscape walls do not need stamped drawings. Taller walls and walls that hold up a driveway, a building, or a steep slope usually do. Local codes often require engineered designs once a wall passes a set height; check with your building department for the threshold that applies to you.
A structural engineer is also warranted when:
- The wall retains a slope steeper than roughly 1:1 above it, or sits on a slope itself.
- The soil is expansive clay, loose fill, or otherwise weak, or groundwater is present.
- The wall will support a surcharge, a driveway, structure, pool, or heavy equipment.
- The wall is terraced, with one wall above another.
- Frost depth is deep and the wall must resist frost heave.
The engineer's job is to calculate the loads the wall must resist, the weight of the retained soil, any surcharge on top, water pressure if drainage is inadequate, and the resistance of the soil beneath the base, and to specify the block, reinforcement, base width, and drainage details that will carry those loads.
Before you buy any blocks, check these items; the list below shows what each one covers.
| Pre-build item | What to do | Why it matters |
|---|---|---|
| Call 811 | Request utility marking before digging | Avoids injury, outages and repair bills |
| Property lines | Locate easements on survey or plat | Walls on easements may be removed at your cost |
| Setbacks | Confirm minimum distance from property lines | Varies by jurisdiction and wall height |
| Permit threshold | Ask building department about permits | Many jurisdictions require a permit above a set height |
| Surcharge | Identify loads within about wall height behind wall | Added load often triggers engineering |
| Drainage path | Find where water runs and where it can legally go | Blocked paths concentrate water and invite failure |
Choosing the Best Materials for Retaining Walls
The right material depends on wall height, soil type, and the look you want. Segmental concrete block is a common choice for DIY and mid-height walls. It stacks without mortar and uses a setback design that locks the courses together.
Ask your supplier for blocks rated for your wall height and check that they include a matching cap block and drainage fabric.
Tools and Materials Checklist
Gather everything before you dig. Running out of crushed stone mid-project causes delays and uneven bases. If you would rather have a professional handle the masonry, see our masonry services in Jackson, MS.
- Tape measure and string line
- Stakes and mason's line
- Shovel and spade
- Plate compactor (rented)
- Level (4-foot and torpedo)
Retaining Wall Foundation Depth and Excavation
The foundation is the most important part of the wall. If you also need groundwork for a driveway near the wall, see driveway installation in Jackson, MS for related site work.
A common mistake is building on loose topsoil. Soil that is not compacted settles, and the wall settles with it. Dig down to firm, undisturbed soil whenever you can.
Retaining Wall Construction Steps: Laying Courses and Setting Alignment
Set the first course carefully. Every course above it depends on it. Place each block on the compacted base, then check it with a level both front to back and side to side.
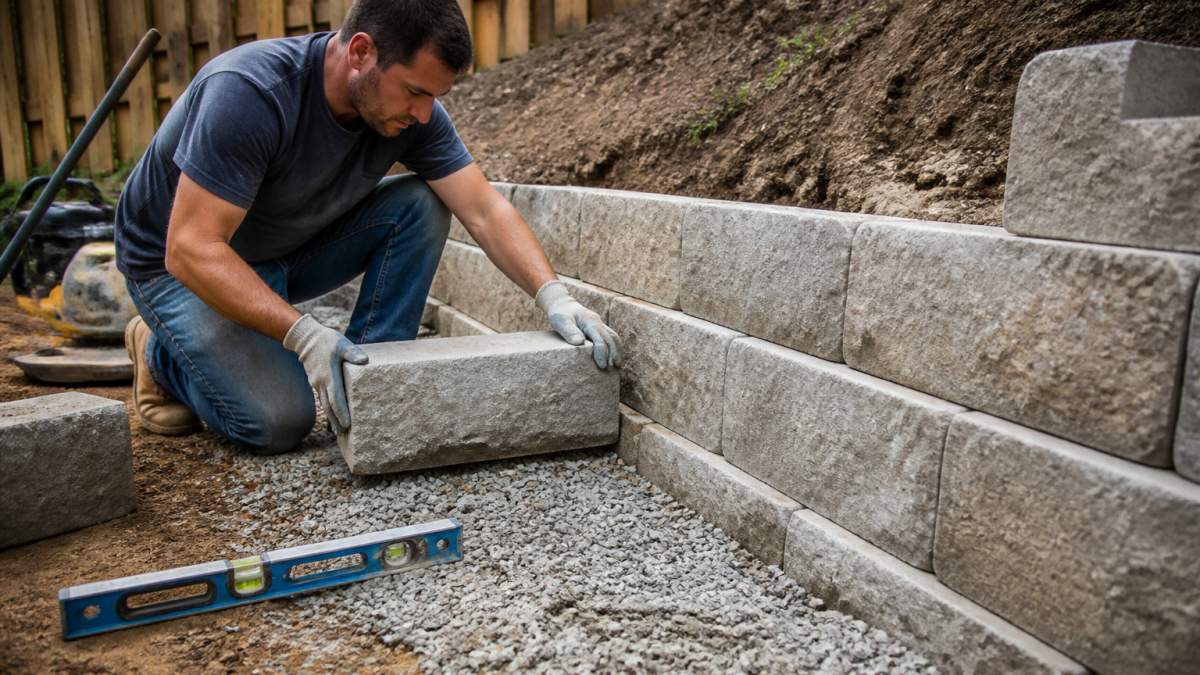
- Lay the first course along the string line
- Level each block and tap it with a rubber mallet
- Set the next course, offsetting joints like bricks
- Apply the manufacturer's setback at each course
- Check alignment with the string line every few blocks
- Install the cap blocks with construction adhesive
Stop and recheck the level after every two or three courses. Small errors add up quickly at the top of a wall.
Retaining Wall Drainage and Backfill to Prevent Failure
Water pressure causes most retaining wall failures. Soil behind the wall holds water after rain, and that water pushes against the blocks. A good drainage system relieves that pressure. This is the section most DIY guides rush, and it is the one that decides whether the wall stands.
How water actually fails a wall
When water saturates the soil behind a wall and cannot drain, it builds hydrostatic pressure, a horizontal push that grows with depth and with the height of the water table behind the wall. Saturated soil also loses shear strength, so the soil itself becomes heavier and less able to support the wall.
The fix is to give water a fast path out from behind the wall and to keep fine soil from clogging that path.
The drainage assembly, layer by layer
Build the drainage system as you backfill, not after:
- Filter fabric against the soil. Line the excavation on the soil side with a geotextile fabric. The fabric lets water through but keeps fine soil particles from migrating into the gravel and clogging it. Wrap the fabric over the top of the gravel at the end so soil cannot wash in from above.
- Drainage aggregate behind the wall. Fill the space between the wall and the fabric with clean, free-draining gravel, washed crushed stone, not crusher run or clay-heavy fill. The gravel column gives water a vertical path down to the drain pipe.
- Perforated drain pipe at the base. Lay a perforated pipe in the gravel at the base of the wall, holes down or per the manufacturer's direction, sloping toward an outlet. Slope matters: a pipe that runs flat or backward holds water instead of releasing it.
- A defined outlet. Daylights the pipe at a low point, a storm drain, or a dry well. A drain pipe with no outlet is a bathtub. Confirm the outlet is legal and does not discharge onto a neighbor's property.
- Backfill in compacted lifts. Backfill behind the drainage gravel in layers, commonly 6 to 8 inches per lift, and compact each lift. Over-compacting directly against the wall can push it out of line, so keep compaction equipment a safe distance back and compact by hand near the blocks.
Surface water and the slope above
Drainage behind the wall is only half the job. Water running down the slope above the wall adds load and erodes soil. Grade the surface above the wall to slope away from it, and consider a swale or surface drain to intercept runoff before it reaches the wall. Keep downspouts and gutter outlets from discharging near the wall.
Warning signs of hydrostatic failure
Inspect the wall after heavy rain and at least once a season. Early warning signs include:
- Bulging or leaning, especially near the middle or at the base.
- Soil or water seeping through the face of the wall.
- Settled or tilted cap blocks.
- Cracks that widen over time.
- Water pooling behind the wall or at its base after rain.
Any of these means water is not leaving the wall system fast enough. Address the drainage before the movement gets worse, a small repair now is cheaper than a rebuild later.
Book Your Retaining Wall Consultation with Solid Rock Brick
Building a structural wall takes planning, the right materials, and careful work at every course. If you want a professional to handle the job, book a retaining wall consultation with Solid Rock Brick. Pricing depends on wall size, materials, and site conditions, so contact us for a quote.
Frequently Asked Questions
How do you build a structural retaining wall?
Start by planning the wall height, length, and location, then check local permit requirements with your city or county building department. Excavate a trench for the base, compact a gravel foundation, and set the first course level, since every course above depends on it. Stack each course with the blocks offset, add drainage aggregate and a drain pipe behind the wall, and backfill in lifts. For walls above the thresholds your local code sets, or walls holding back a slope or structure, have a licensed engineer review the design before you build.
What materials are best for a structural retaining wall?
Materials depend on wall height, soil load, and appearance. Segmental concrete retaining wall blocks are common for walls of moderate height because they are manufactured to consistent dimensions and interlock with a setback. Poured concrete and reinforced masonry suit taller or heavily loaded walls. Natural stone and brick can look attractive but need proper footings and reinforcement to stay stable. Pricing depends on quantity, dates, and delivery, so request a current quote from Solid Rock Brick for your project.
How deep should the base of a retaining wall be?
The base should sit below the frost line and on compacted material, typically a gravel base several inches deep with the first course partly buried. Many segmental block systems call for the first course to be buried a set depth, often about one block height, to resist sliding and overturning. The exact foundation depth depends on wall height, soil type, and local code, so confirm the requirement with your building department or an engineer before excavating.
When does a retaining wall need an engineer?
A retaining wall usually needs an engineer when it is tall, when it supports a driveway, building, or pool, when the slope above it is steep or loaded, or when local code requires a permit with engineered drawings. Walls over the height your jurisdiction sets often trigger a permit review. An engineer can calculate soil pressure and surcharge loads and specify reinforcement and drainage that a standard DIY layout may not provide.