 how-to
How to Build an Outdoor Stone Fire Pit: DIY Guide
Table of Contents
- Planning Your Stone Fire Pit: Size, Shape, and Location
- Fire Pit Safety and Placement: Clearances That Matter
- Best Stone for a Fire Pit: What Handles Heat
- Fire Pit Base Materials: Building a Foundation That Lasts
- Step-by-Step: Stacking Stone Courses and Adding the Liner
- Stone Fire Pit Cost: What Drives the Budget
- Maintenance, Smoke Management, and When to Call a Mason
- Frequently Asked Questions
Last Updated: October 4, 2026
Planning Your Stone Fire Pit: Size, Shape, and Location
A stone fire pit is a permanent outdoor feature built from stacked natural stone, pavers, or concrete blocks around a heat-safe liner, designed to contain a fire safely in your yard.
At Solid Rock Brick, we have spent 16 years building stone features for homes and businesses, and in our experience, the projects that go wrong almost always skipped this step.
Choosing the Right Diameter and Wall Height
Most backyard fire pits land between 36 and 44 inches across. That fits four to six people, burns well, and does not overwhelm a patio.
Wall height matters just as much. Keep the finished wall between 12 and 16 inches tall. Any higher and you block heat and light.
A quick guide:
- Small (30-36 inches): two to four people, tight patios
- Standard (36-44 inches): four to six people, most backyards
- Large (44-60 inches): six or more, big open yards
Match the shape to your space. Circles suit open lawns. Squares and rectangles fit better against patios and seat walls.
Checking Local Fire Codes and Permits First
Call your local fire marshal and planning office before you dig. Many areas require a permit for any open-burning structure, and some ban them outright during burn restrictions.
Ask about required clearances too. A common rule is 10 feet from structures and 15 to 25 feet from tree limbs and property lines, but your code decides. Rules vary by city and county, so get the answer in writing.
Fire Pit Safety and Placement: Clearances That Matter
Placement is a safety decision before it is a design one. A fire pit needs open air above it, clear ground around it, and a surface that will not catch.
Pick a spot on level ground at least 10 feet from your house, fence, and shed.
Check the wind. Watch your yard for a few days and note which way smoke drifts. Putting the pit upwind of your seating area keeps everyone comfortable.
What most guides miss is drainage. A pit sitting in a low spot collects water, and standing water breaks down the base over time.
- Never place a pit under a roof overhang or on a wood deck
- Keep a bucket of sand or a fire extinguisher within reach
- Do not use a fire pit on a burn ban day
Best Stone for a Fire Pit: What Handles Heat
The best stone for a fire pit is dense, natural stone that resists heat and does not hold moisture. Good choices include granite, fieldstone, and fire-rated brick.
Heat is hard on stone. It expands when hot and shrinks when cool, a cycle that cracks weak or wet material over time.
Fire bricks are the standard for the inner ring because they are made for high heat.
Stones to Avoid Near Open Flame
Some stone fails badly around fire. Avoid these:
- River rock and pebbles: trapped moisture turns to steam and the stone can pop
- Concrete blocks: they spall and crack under direct flame
- Shale and sandstone: they layer and split when heated
Fire Pit Base Materials: Building a Foundation That Lasts
A fire pit base is the compacted gravel and sand layer that supports the stone wall and keeps it level. Skip it and the wall shifts, cracks, and leans within a season. This is the step most guides gloss over, and it is the one that decides whether your pit lasts five years or twenty.
Gather your fire pit base materials before you start:
- Crushed gravel or paver base (¾-inch minus is the common grade), about 4 to 6 inches deep
- Masonry sand, about 1 inch for leveling
- Landscape fabric to stop weeds
Excavation, Gravel, and Sand Layers
Dig a circle about 6 inches wider than your planned pit on every side. That extra room holds the wall and the base. For a 42-inch pit, that means an excavation roughly 54 inches across.
Set the layers in this order:
- Tamp the bare soil flat. Remove any roots, sod, or soft spots first, organic material decays and leaves voids.
- Add 4 to 6 inches of gravel in 2-inch lifts, tamping each one before the next. A plate compactor does this in minutes; a hand tamper works but takes longer.
- Lay landscape fabric over the gravel to keep fines from migrating up.
- Add 1 inch of sand and screed it level with a straight board.
Check level in every direction. A base that is off by half an inch shows up as a leaning wall later.
Drainage and Slope
Water is the quiet killer of stone fire pits. A pit sitting in a low spot collects water, and standing water breaks down the base over time. Two rules keep you dry:
- Set the base so it sheds water away from the pit, not into it. A slight slope of about 1/8 inch per foot is enough.
- If your yard drains toward the pit, build the base up slightly above grade rather than digging it flush.
If the pit sits on a patio, drill or leave weep holes in the bottom course so water can escape. A pit that holds water will heave in freeze-thaw cycles and crack its own base.
Step-by-Step: Stacking Stone Courses and Adding the Liner
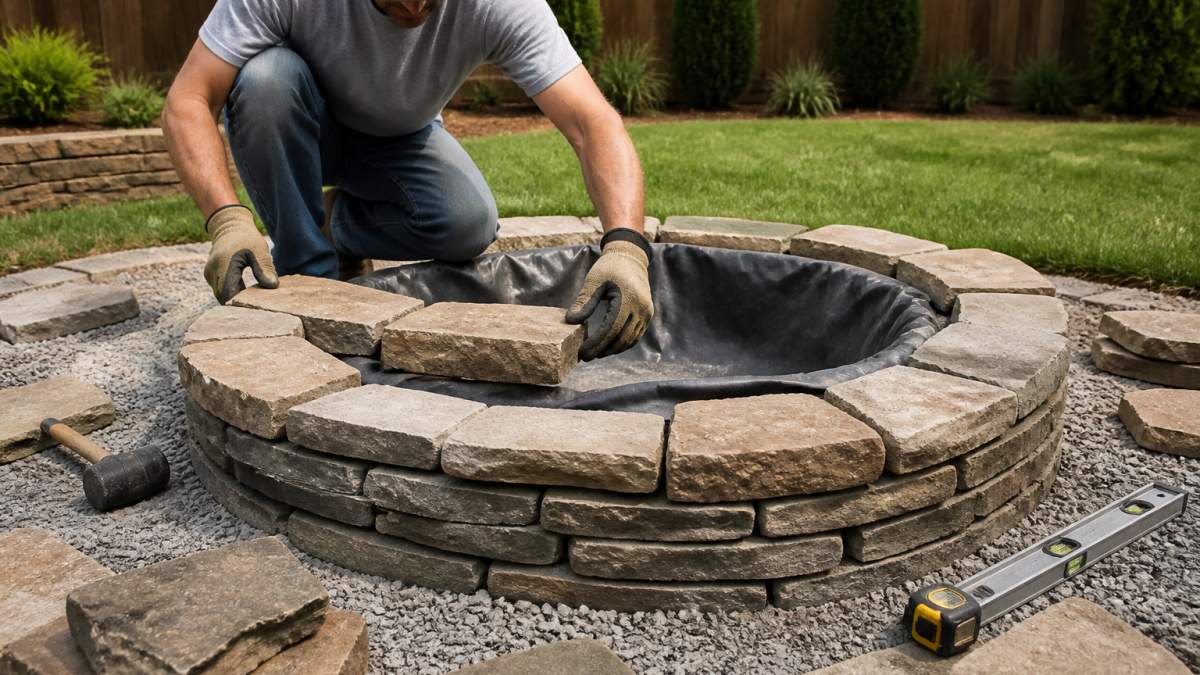
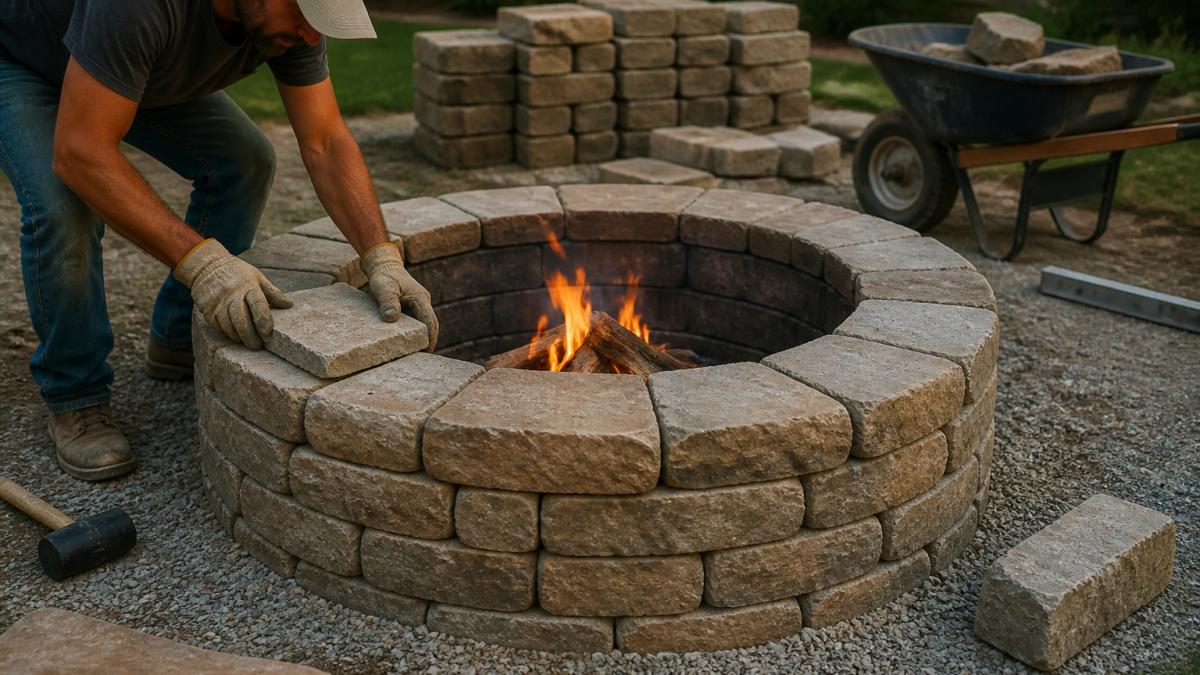
Stacking is where the pit takes shape. Mark your circle with a rope and stake, then lay the first course of stone around the line. Check level after every stone.
Build each course so the stones overlap the joints below, like brickwork. This bonds the wall and adds stability. Keep the inside face as smooth as you can.
Dry-Stack vs. Mortared Construction
Dry-stacking means stacking stone with no mortar. It drains well, handles movement, and you can rebuild it. Mortared construction uses masonry mortar to bond the stone into one solid wall.
| Method | Best For | Watch Out For |
|---|---|---|
| Dry-stack | Quick builds, good drainage, easy repairs | Stones can shift over time |
| Mortared | A clean, permanent look | Cracks if the base settles |
Once the wall is up, add the fire-resistant lining. Set fire bricks against the inner wall, or drop in a steel or cast iron insert. Fill the floor with lava rock or sand to protect the base.
Stone Fire Pit Cost: What Drives the Budget
Stone fire pit cost depends on size, stone choice, and whether you build it yourself or hire a mason. A DIY build using concrete blocks and a store-bought insert costs far less than a custom natural stone pit. The gap between the cheapest and most expensive version of the same 42-inch pit can be several times over, so it pays to know what moves the number.
Estimating Materials for a Standard 42-Inch Pit
For a 42-inch inside diameter pit with a 12- to 16-inch wall, a common material list looks like this:
- Wall stone: roughly 30 to 40 square feet of face area, depending on stone size and course height
- Fire bricks: about 40 to 50 bricks to line the inner ring
- Base gravel: about 0.5 cubic yard of ¾-inch minus
Quantities shift with wall height, stone thickness, and whether you dry-stack or mortar. Buy 10 percent extra to cover cuts and breakage.
The Biggest Cost Drivers
- Stone type: natural granite and fieldstone cost more per square foot than concrete block or pavers. Concrete block is the budget option; natural stone is the upgrade.
- Size: more courses mean more material. Going from a 12-inch wall to a 20-inch wall adds roughly a third more stone.
- Liner: a steel or cast iron insert costs more than fire bricks but installs faster and lasts longer.
Cutting Costs Without Cutting Corners
You can cut costs with repurposed materials, like leftover pavers or fieldstone from another project. Dry-stacking saves the mortar and the mason.
What you should not cut: the base. A cheap base is the most expensive mistake in the project, because a settled pit has to be torn out and rebuilt.
For current pricing on materials and installation, contact us for a quote, since cost depends on your site and design.
Maintenance, Smoke Management, and When to Call a Mason
Smoke management comes down to airflow. A fire needs air from below and space above.
Build the fire small and let it grow. A tall, crowded fire smokes because the wood cannot breathe.
A few habits keep the pit working:
- Scoop out ash after each burn
- Check the wall for loose or cracked stones
- Re-tamp the base if you see settling
- Cover the pit in wet seasons to keep water out
Call a mason when you see a leaning wall, cracked mortar, or a base that has shifted.
At Solid Rock Brick, we handle stone fire pit builds, repairs, and custom stone features for homes and businesses.
Frequently Asked Questions
What is the best stone to use to build a fire pit?
Granite, limestone, and fire bricks handle heat well and resist cracking from thermal cycling. Natural stone like granite is dense and durable, while fire bricks are engineered specifically for high temperatures. Avoid river rocks, sandstone, and any stone that has absorbed moisture, because trapped water turns to steam and can cause the stone to split or throw fragments. For a stone fire pit, choose dense, non-porous materials and consider a fire-resistant lining to shield the outer wall from direct flame.
How deep should the base of a stone fire pit be?
Plan for a base that is 6 to 8 inches deep after compaction. That usually means excavating about 10 to 12 inches to account for a 4-inch gravel layer, a 2-inch sand layer, and the first course of stone sitting slightly below grade. Digging to this depth on level ground gives you a stable foundation that resists settling and keeps the stone courses from shifting over time. Skipping this step is one of the most common reasons DIY fire pits crack or lean within a year.
How far should an outdoor fire pit be from a house?
Most local fire codes require at least 10 feet of clearance from structures, and some jurisdictions ask for 15 to 25 feet. Keep the fire pit away from low-hanging tree branches, wooden fences, and anything flammable. Check with your local fire marshal or permitting office before you dig, because requirements vary by city and neighborhood. Proper placement also improves airflow, which reduces smoke and keeps the fire burning efficiently.
Is it cheaper to buy or build a fire pit?
A DIY stone fire pit cost depends on stone type, liner, and base materials, so pricing varies by project. Store-bought metal or kit fire pits are faster to set up but often wear out sooner. If you want a permanent feature that matches your patio and landscaping, building with stone typically delivers better long-term value.
A fire pit should last for years, not one season. If your wall is leaning, your base has settled, or you want a custom stone pit built right the first time, we can help. Solid Rock Brick offers expert stone work, durable masonry, and a commitment to getting your project done the way you pictured it. Contact us to talk through your fire pit or any custom stone project.